


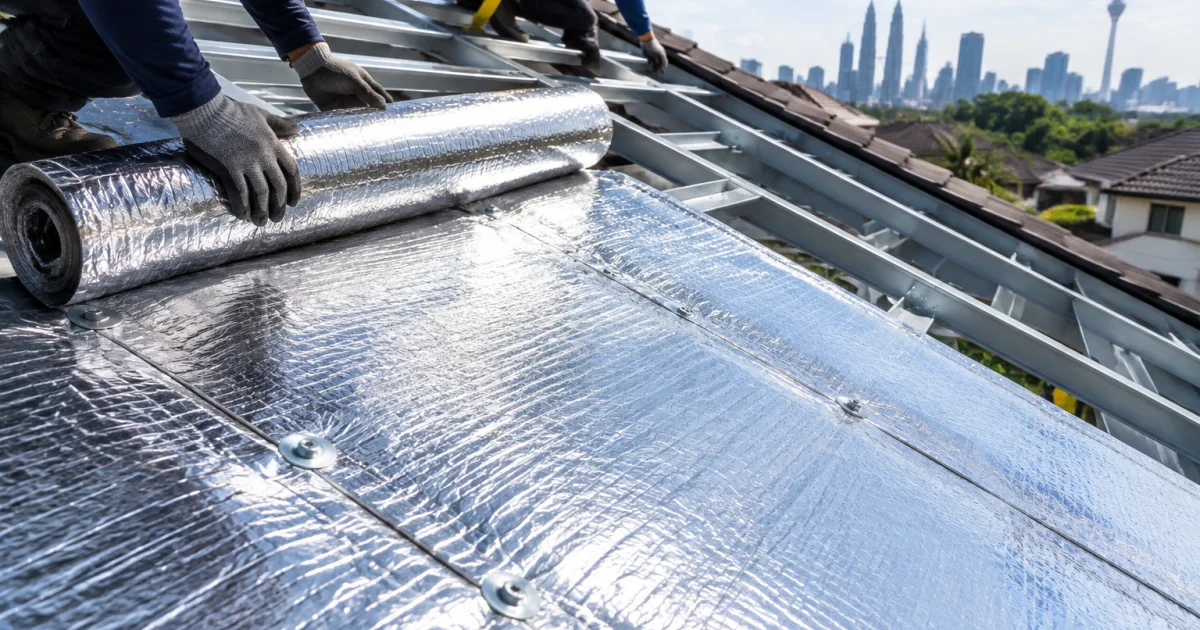
How Aluminium Heat Insulation Is Installed on Roofs in KL (Step-by-Step) and What to Check Before You Approve the Work
Roofs in Kuala Lumpur and the Klang Valley take constant stress from sun, humidity, and heavy rain. When rooms stay hot even with fans or air-conditioning, many owners consider adding a reflective layer under the roof. Problems usually happen when the job is approved without knowing what “good installation” looks like—leading to sagging foil, blocked ventilation, rattling sheets, or leaks discovered only after storms.
This tutorial explains the typical workflow for Aluminium heat insulation KL projects so landed homeowners and building owners can understand the method before booking an inspection. You’ll also learn what to check at handover so you can approve workmanship, not just the material.
Heat insulation and waterproofing are different, but they meet at the roof. If the roof covering is already compromised (cracked tiles, rusted screws, valley leaks), insulation won’t solve comfort issues and may hide early leak warning signs. A good contractor flags these before installation so you don’t pay twice.
1) What aluminium heat insulation does (and what it doesn’t)
Most aluminium insulation sheets work by reflecting radiant heat. Under sun, the roof surface heats up and radiates downward into the roof void and ceiling. A reflective foil layer helps bounce part of that heat away, reducing heat transfer into living or working spaces.
Set expectations clearly:
- Not waterproofing: Foil doesn’t stop water entering through tiles, flashing, screw holes, ridges, or valleys. It can also delay detection until ceiling stains appear.
- Not a ventilation substitute: The roof still needs balanced airflow (intake + exhaust) to manage heat and moisture.
- Condensation depends on details: Humidity, airflow, and temperature differences drive condensation; poor installation can make it worse.
- Methods vary by roof type: Concrete/clay tiles vs metal deck, and truss vs purlin framing, require different fixing and detailing.
When reviewing a proposal, ask what heat path is being targeted (radiant vs conductive). Foil mainly targets radiant heat; composite foil-bubble/foil-foam options can add some conductive resistance too.
2) Pre-install inspection in KL: what a good contractor checks first
A strong insulation outcome starts with an honest roof assessment. KL roofs are often patched over the years, and insulation is sometimes installed over defects. Before cutting material, a competent roofing contractor Kuala Lumpur typically checks:
Roof covering condition (tiles or metal deck)
- Tiles: broken/slipped tiles, cracked ridge tiles, failing mortar, valley condition, existing underlay.
- Metal deck: rusting sheets, loose/overdriven screws, degraded washers, failed sealant lines, lap joint condition.
If there are active leaks, resolve them first (or together with insulation) instead of hoping foil will “cover” the issue. This is the right time to discuss Roof leaking repair KL options if leakage is suspected.
Roof structure and access
- Framing type and condition (timber/steel truss, purlins/battens, spacing).
- Access plan (roof hatch/ceiling access, scaffolding, fragile zones).
- Pest/moisture signs (damp timber, mold, termite evidence, nesting).
Ventilation and heat build-up sources
Insulation performs better when the roof void can release heat and moisture. The contractor should identify:
- Blocked ridge vents or missing ventilation gaps
- Gable/eave vents and whether they are obstructed
- Bathroom/kitchen exhaust ducting that terminates inside the roof space (a common moisture source)
Existing electrical and mechanical items
Roof spaces often contain wiring, downlights, solar conduits, CCTV/antenna cables, or tanks. The installer should route and fix insulation without trapping heat around fixtures or creating abrasion points that tear foil.
Scope decision: under-roof vs above-ceiling
- Under the roof covering: attached to rafters/purlins, facing the heat source; usually best performance when feasible.
- Above the ceiling: laid over ceiling boards when access is limited; effectiveness depends on layout and air gaps.
For many landed homes in KL, under-roof installation is preferred because it intercepts heat before it saturates the roof void.
3) Materials and tools you should expect to see on site
Product types differ, but the on-site “must-haves” are broadly consistent. Knowing what is normal helps you spot red flags early.
Common insulation sheet types
- Single-sided reflective foil
- Double-sided foil (sometimes reinforced)
- Foil-bubble / foil-foam composites for added thickness
Ask for the product name/spec and intended orientation. Typically, the reflective face should face the heat source and have a suitable air gap to work effectively.
Fasteners and tapes
- Staples/fasteners appropriate for timber or steel framing
- Reflective foil tape (or approved high-temperature tape) for overlaps and edge control
- Strapping/battens where needed to support sheets or maintain spacing
Red flag: low-grade household tape. Malaysian roof voids run hot; weak adhesives peel, seams open, and edges curl.
Access and safety equipment
- Platforms/crawl boards (especially under tiled roofs)
- Harnesses where required, stable ladders, controlled tool handling
- Debris control (bags/housekeeping so sharp offcuts aren’t left behind)
Even without climbing up, you can ask how the team will avoid stepping on tiles, damaging flashing, or loosening metal-deck screws while moving.
4) Step-by-step: how aluminium heat insulation is installed under roof tiles (typical KL method)
Concrete and clay tiled roofs are common in KL. The aim is a reflective layer that is supported and sealed, without sagging or blocking airflow at eaves/ridges.
Step 1: Prepare the roof void and protect the ceiling
- Clear loose debris; remove/identify sharp protrusions that can puncture foil
- Mark downlights or other hot fixtures
- Ensure surfaces are dry before taping overlaps (adhesion fails on damp/dusty areas)
Step 2: Confirm airflow paths before closing anything
Locate eave intakes and ridge/gable exhaust paths. If insulation is packed tightly into eaves, intake air can be blocked, trapping heat and humidity. Ask: “Where will air enter and where will it exit after installation?”
Step 3: Measure and cut sheets with planned overlap
- Maintain consistent overlap to reduce gaps and flutter
- Minimize unnecessary seams (each seam is a failure point)
- Leave controlled clearance around penetrations (pipes/ducts) to prevent tearing
Step 4: Fix the foil to rafters or battens without sagging
- Taut installation: avoid deep “pockets” that trap dust/moisture and tear over time
- Even fastening: reduces wind movement and noise
- Clean fastening lines: avoid repeated re-stapling that weakens the sheet
Minor undulations can be normal; large hanging sections are not.
Step 5: Seal overlaps and edges with suitable foil tape
- Tape pressed firmly along full seam length
- Surfaces cleaned (dust reduces adhesion)
- Edges kept neat at eaves so ventilation remains open
Step 6: Detail around penetrations, valleys, and junctions
- Vent pipes: clean cut + taped collar detail with no open gaps
- Valleys: do not interfere with drainage paths or trap debris
- Roof-wall/party wall junctions: avoid creating moisture traps where roof meets wall
If there is recurring dampness near roof junctions, flag it early. Sometimes the source is water tracking at wall joints; separate works like wall waterproofing services or targeted crack repairs may be needed depending on diagnosis.
Step 7: Final internal check and tidy-up
- Remove offcuts, loose staples, and tape backing
- Confirm wiring is not pinched, stapled over, or forced against sharp edges
- Keep access hatches usable for future maintenance
5) Step-by-step: installation under metal deck roofs (and what differs)
Metal deck roofs are common for extensions, porches, shop lots, and warehouses. They heat up fast and expand/contract with temperature, and leak risks often come from screws, washers, laps, and corrosion. Insulation helps comfort, but only after the deck is confirmed sound.
Step 1: Inspect the metal deck before any insulation goes in
- Screw lines and washers (perished washers are a common leak source)
- Rust at laps, ridges, gutters, and penetrations
- Previous patchwork (silicone blobs, mismatched sealants)
If corrosion is severe or leakage is recurring, address roof condition first; in some cases, metal deck roofing replacement is the better long-term plan.
Step 2: Decide the fixing method: underside attachment vs integrated system
- Underside attachment: fixed to purlins/framing from below; common for existing roofs.
- Integrated installation: installed during roof replacement as part of the new assembly; usually neater and easier to detail.
For existing buildings, underside attachment is typical but must be well-supported to prevent flutter and noise.
Step 3: Create/maintain an air gap (if required by the product)
Reflective insulation generally performs best with an air space. If pressed directly against the metal deck, performance can drop. Battens/strapping may be used depending on the structure.
Step 4: Fasten with consistent spacing and control edges
- Fasteners consistent, especially along edges
- Edges taped or mechanically secured to prevent flutter
- No tearing at fastening points
Step 5: Detail penetrations (vents, ducts, skylights) carefully
Metal deck roofs often have multiple penetrations. Insulation should not be pulled tight over sharp edges. If penetrations are also leak points, coordinate roof repair/plumbing work rather than treating insulation as a stand-alone fix.
Step 6: Verify drainage and gutter interfaces are not obstructed
Insulation installed from below should never block gutter outlets or drainage routes. If there are overflow stains or wall dampness, inspect gutters/downpipes at the same time.
6) The approval checklist: what to check before you sign off
Use this as a practical handover list. If roof access isn’t safe, ask for clear photos/videos for each checkpoint (ridges, eaves, valleys, penetrations).
A. Workmanship and coverage
- Continuous coverage: no large missing areas (especially ridges, hips, corners).
- Consistent, taped overlaps: seams not left open or flapping.
- Minimal sagging: reduces dust/moisture pockets and tearing risk.
- Neat edges and repairs: torn sections repaired properly (or replaced), not ignored.
B. Ventilation is not blocked
- Eave intake paths remain open
- Ridge/gable outlets not sealed over
- Bathroom/kitchen exhausts vent correctly (not dumping moist air onto insulation)
If airflow is unclear, request a simple explanation of the intake and exhaust path. Trapped heat can reduce the comfort improvement you’re paying for.
C. Junction details are neat
- Penetrations (pipes/ducts) taped and supported
- Valleys and roof-wall junctions not packed tight in a way that traps water/debris
- Access hatches remain usable
D. Electrical and safety concerns
- No wiring stapled through or pinched
- Downlights and heat sources have adequate clearance
- No sharp debris left in the roof void
E. Leak risk is addressed, not ignored
Insulation is not leak repair. If there were known leakage points, approval should include what was done (or what was recommended) and it should be documented. Depending on the source, solutions may involve roof repairs, flashing works, or targeted methods such as PU injection/pressure grouting for certain crack-related leakage paths.
F. Practical example: what a “good” vs “risky” finish looks like
Example 1 (good): In a double-storey terrace house, sheets are taut under tiles, overlaps are taped, eave gaps remain open, and penetrations are sealed neatly. The owner receives completion photos from ridge to eaves, plus close-ups of pipe collars.
Example 2 (risky): In a porch metal deck, foil hangs with wide sagging, edges are unsecured, and tape peels. After wind, the sheet flutters and tears at fasteners. A screw leak develops but is missed because the foil blocks visibility until ceiling staining appears.
7) Common mistakes in KL installations (and how to prevent them)
Material quality matters, but performance and durability are usually decided by workmanship. Watch for these common issues:
Blocking ventilation at eaves
What happens: Heat and humidity build up, increasing mold/condensation risk.
Prevention: Ask the installer to show how intake air remains open at the eaves; insulation should be cut and fixed to preserve airflow, not stuffed tight to the fascia.
Overusing fasteners or tearing the foil
What happens: Punctures weaken the sheet; tears spread with movement.
Prevention: Look for tidy fastening lines and proper tear repairs. Replace badly damaged sections rather than repeatedly patching.
Using low-grade tape that fails in heat
What happens: Seams open, edges curl, dust enters, and performance drops.
Prevention: Confirm reflective foil tape/high-temperature-rated tape is used and surfaces are cleaned before taping.
Ignoring roof defects during insulation work
What happens: Water entry continues; insulation may conceal leaks and increase ceiling damage.
Prevention: Request a simple roof condition report before installation and decide whether repairs should be done first or together, especially for tile valleys, flashing, ridge issues, and metal-deck screw lines.
Not coordinating with waterproofing where needed
If you also have balcony seepage, wall damp patches near the roofline, or cracks that open during heavy rain, insulation alone won’t solve the symptom. In these cases, coordinate separate diagnostic and repair works (roof vs plumbing vs wall joints) instead of treating each sign in isolation.
8) How to choose the right contractor and scope (so you don’t pay twice)
Because much of the work is hidden, contractor method and documentation matter as much as product choice. Use these steps to reduce risk:
Step 1: Ask for a site assessment, not a “price by WhatsApp” quote
Roof geometry, access, ventilation, and defect history vary widely. If a quote is given without clarifying roof type, access, and leak history, treat it cautiously.
Step 2: Confirm the method for your roof type
- Tiled roofs: fixing method, how eave ventilation is preserved, penetration detailing.
- Metal deck: what will be checked for rust/screw leaks first, and how flutter/noise will be prevented.
Step 3: Align insulation with roof maintenance planning
If a metal deck is near end-of-life, it can be more cost-effective to plan insulation together with repair/replacement rather than install now and dismantle later. For tiled roofs with frequent tile slip or failing ridge mortar, fix the roof covering first to protect the insulation investment.
Step 4: Get a clear completion handover package
- Photos of key areas (eaves, ridges, valleys, penetrations)
- Confirmation of material used (product/spec on invoice)
- A short do-and-don’t list for future ceiling/electrical works
Step 5: Consider a one-provider approach when heat + leak issues overlap
Many owners start with heat concerns but uncover leakage risks during inspection. A provider that can also handle roof repairs and related waterproofing (when needed) can reduce coordination gaps. If later you need tile/metal-deck repair or non-invasive solutions such as pressure grouting/PU injection for certain crack-related seepage, it helps when the team already knows the roof layout and what was installed.
Conclusion: approve the process, not just the material
Aluminium reflective insulation can reduce heat entering a KL home or building, but results depend on correct tension, consistent overlaps, careful detailing at penetrations, and preserved ventilation. Disappointing outcomes are usually caused by poor planning and workmanship, not the foil itself.
Before signing off, confirm coverage, taped seams, no blocked eaves, safe clearance around electrical items, and a documented plan for any roof defects. If the roof is already leaking, repair it first (or together) so water damage doesn’t undermine the insulation.
If you want to review product options, refer to Cisco Waterproofing’s Aluminum Heat Insulation Sheet page for a quick overview of the material category and typical applications.
For older tiled roofs, rusting metal decks, or properties with repeated ceiling stains, pair insulation planning with a roof inspection so you can decide the correct scope once and approve with confidence.
Frequently Asked Questions
How long does aluminium heat insulation installation take for a typical KL landed house?
Most landed homes can be done within a day or two depending on roof size, access, and complexity (valleys, penetrations, tight roof voids). If the contractor also needs to fix roof defects first—like broken tiles, ridge issues, or metal deck screw leaks—allow additional time for repairs and drying/curing where applicable.
Can aluminium heat insulation stop roof leaks?
No. Reflective insulation is designed to reduce radiant heat transfer, not to waterproof the roof. If you have active leakage, address the source first (tiles, flashing, valleys, metal deck screws, gutters, or plumbing). Insulation installed over an unresolved leak can hide early warning signs until ceiling damage becomes obvious.
Will aluminium heat insulation cause condensation or mold in the roof space?
It depends on ventilation and installation details. If ventilation at the eaves or ridge is blocked, warm moist air can accumulate and increase condensation risk. A proper installer preserves airflow paths, avoids trapping moist air from bathroom/kitchen exhausts, and ensures overlaps and penetrations are detailed neatly to reduce moisture traps.
What should I check before approving the completed insulation work?
Check for continuous coverage, consistent overlaps that are taped, minimal sagging, neat detailing around pipes/ducts, and that roof ventilation is not blocked—especially at the eaves. Also confirm no wiring is pinched or stapled through, and request completion photos of key areas (eaves, ridges, valleys, penetrations).
Is it better to install insulation during metal deck roofing replacement?
Often, yes. When a metal deck is being replaced, it’s easier to integrate insulation neatly and address rust, screw lines, and penetrations properly. If your deck is already corroded or repeatedly leaking, consider solving the roof condition first; otherwise you may pay to install insulation now and then dismantle or disturb it later during replacement.
Book a Roof Heat & Leak Assessment with Cisco Waterproofing
If you’re planning aluminium heat insulation for your KL or Selangor property, get the installation method and approval checklist clarified on-site before you commit. Cisco Waterproofing can assess roof condition, ventilation, and access, then advise the most suitable approach—whether it’s heat insulation installation, roof tile/metal deck repair, or additional waterproofing support where needed.
If the inspection reveals related issues (like ceiling stains, crack seepage, or screw-line leaks), our team can also help coordinate the right solution—from roof repairs to non-invasive options like pressure grouting/PU injection—so you fix the root cause instead of repeating patchwork.